What should you check about automatic display brightness?
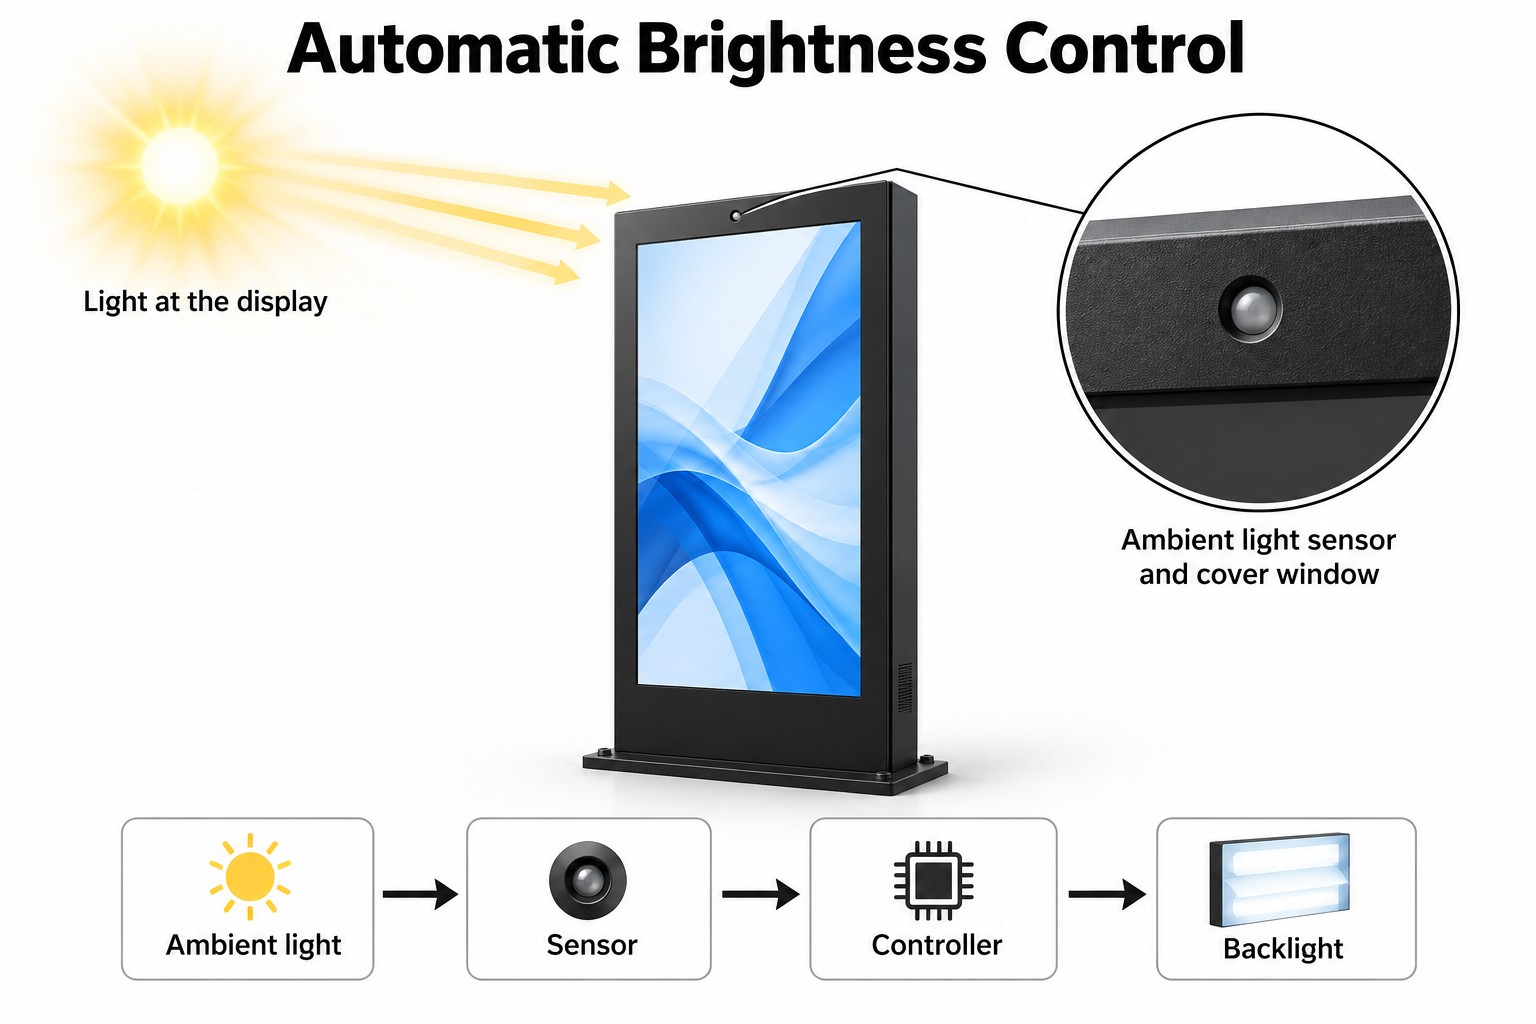
An ambient light sensor measures surrounding light so a controller can adjust the backlight. The useful result depends on sensor placement and the configured response, not just the presence of a sensor.
- Keep the sensing area unobstructed and relevant to the display's lighting.
- Confirm automatic, scheduled and manual-mode priorities.
- Test bright, dim and changing conditions from the customer's position.
- Check smooth transitions, restart behaviour and the normal operating day; lux readings are not the same as screen luminance in nits.
The sensor is only one part of that behavior. Its position, the cover in front of it and the control settings all matter. This guide explains what to check when specifying automatic brightness for a shop window, an outdoor information screen or a battery-powered advertising display.
What the sensor measures
Ambient light sensors are commonly specified in lux, a measure of illuminance at a surface. Screen luminance is commonly expressed in nits, or candelas per square meter. These quantities describe different things. A reading of the surrounding light is not a direct measurement of how much light the display emits.
Texas Instruments describes the OPT3001 as a visible-light sensor whose response is designed to follow human vision. Its documentation also explains how an ambient reading can inform backlight control. This illustrates the principle; it does not identify the sensor installed in any particular signage product.
See TI’s ambient light sensor documentation and its display backlight control brief.
The controller connects the reading to brightness
The control system maps an input reading to a backlight setting. That mapping needs limits and a response suited to the site. A sensor with a wide measurement range cannot establish that the completed display has a well-tuned brightness curve or behaves comfortably during rapid changes.
Ask whether the offered unit provides automatic adjustment, a schedule, manual brightness or a combination. These functions are not interchangeable. Record which setting takes priority when they overlap and how an operator returns the display to its normal mode after maintenance.
Why sensor placement matters
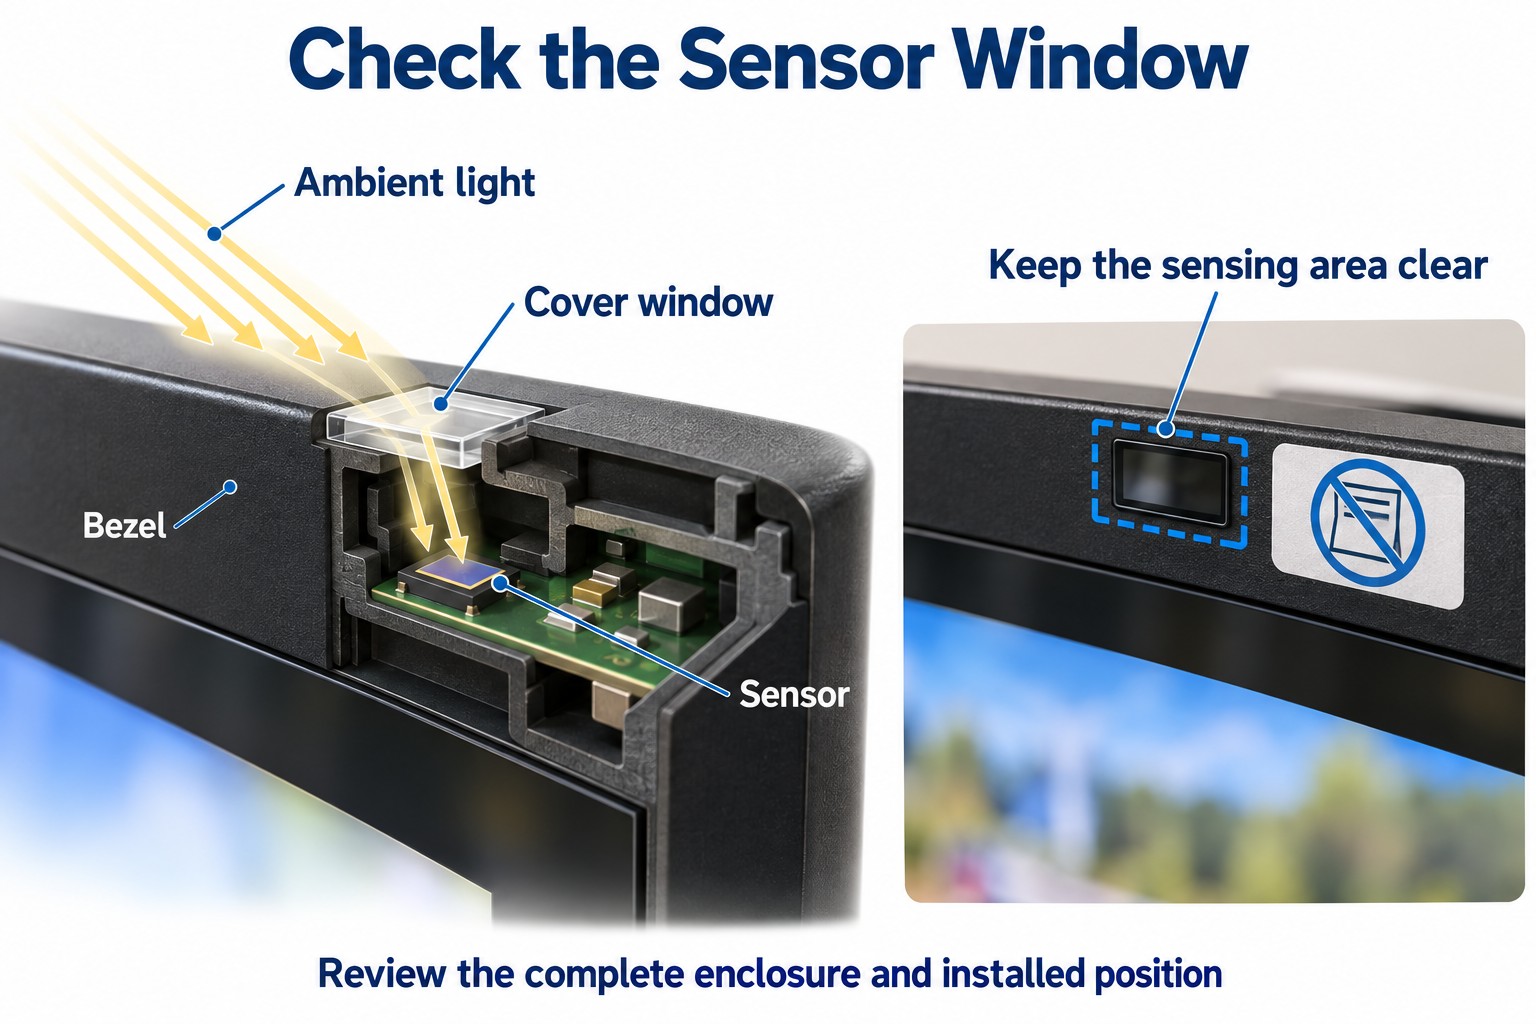
The sensor should observe lighting relevant to the display face. A location shaded by a deep frame may see different conditions from the visible screen. A nearby lamp may also dominate its reading. Evaluate placement on the assembled enclosure rather than approving an exposed sensor on a workbench.
Cover glass, tinted windows and the opening around a sensor can affect the light reaching it. TI’s integration guidance discusses both the optical window and field of view. A changed cover or enclosure detail therefore needs review, even when the electronic part remains the same.
Read TI’s guidance on sensor windows and placement.
Check the finished installation
For a window display, record which side of the glazing holds the screen and which direction the sensor faces. Include window film, overhangs and nearby lighting in the review. The installation team should be able to point to the sensing area and explain what must remain clear.
For an outdoor unit, inspect the final location after mounting. A temporary sign, decorative trim or accumulated dirt can obstruct a small sensor window. Add a visual inspection to routine maintenance and follow the supplier’s cleaning guidance. Do not apply a film or sticker over the sensing area.
Make brightness changes comfortable
A passing shadow should not necessarily cause an abrupt brightness jump. Ask how the controller smooths short changes and avoids repeated switching around a threshold. Hysteresis uses different switching points for rising and falling input; filtering can reduce sensitivity to brief fluctuations. Confirm which behavior the proposed system actually provides.
Test a gradual change as well as a sudden one. Watch the display after moving from brighter to dimmer conditions, and then reverse the sequence. Record whether it settles, changes repeatedly or takes too long for the application. Agree on acceptable behavior rather than imposing an arbitrary response time.
Minimum and maximum settings also need attention. Check that the low setting remains readable at the intended viewing distance. Check the upper setting using realistic content and ambient conditions. Automatic adjustment does not remove reflections or substitute for an appropriate display and front-glass specification.
Three common commercial applications
Shop windows
A shopfront can move between direct sun, shade and interior lighting during the day. Review the screen from outside, where the intended audience stands. A comfortable view inside the shop does not establish readability through the window. Include the actual promotional artwork in the evaluation.
Our high-brightness window display page provides a starting point for this product type. Confirm the sensor and automatic-control configuration in the quotation, together with mounting position and operating requirements.
Outdoor information screens
Review daylight readability and the appearance after dark separately. Agree on the site’s permitted operating hours and brightness requirements with the project team. A light sensor does not replace a schedule when the screen must switch off at a defined time or follow site-specific operating rules.
Battery-powered signage
Backlight settings belong in a battery runtime comparison. If one trial uses fixed maximum brightness and another uses automatic adjustment, label those conditions clearly. Do not present the results as equivalent. Keep the playlist, operating period and relevant environment observations with the runtime record.
See high-brightness battery-powered digital signage for the available product format. Obtain the applicable runtime conditions for the selected brightness version; a sensor alone does not justify a new hours-of-use claim.
Commissioning checks before approval
- Identify the sensing area and check that the installed enclosure leaves it clear.
- Confirm automatic, scheduled and manual modes and their priorities.
- Observe the display through brighter, dimmer and changing conditions.
- Check readability from the intended audience position with normal content.
- Restart the unit and verify that the approved settings return.
- Record the fallback behavior if the sensor reading is unavailable.
Request an operator procedure for unusual behavior. Staff should know how to check an obstruction, confirm the active mode and contact support. Avoid leaving a display permanently at a manual setting simply because a commissioning issue was never investigated.
Save the approved settings with the unit’s configuration record. After a controller update, sensor replacement or enclosure change, repeat the relevant checks. This makes later service decisions more reliable than comparing the screen with someone’s memory of its earlier brightness.
Turn the installation survey into a control brief
Before selecting a sensor option, walk through the site’s normal operating day. Note when the display faces daylight, when the surrounding lights switch on and when customers stop using the area. Identify who controls those changes. A shop manager’s description of the opening and closing routine can reveal requirements that a midday site photograph misses.
Mark the intended audience position on the installation drawing. The conditions at that position may differ from those immediately around the sensor. Review a window display from the pavement and an information screen from its approach route. The objective is appropriate viewing at those positions, not simply a changing number in a controller menu.
Include seasonal or operational changes that the team already knows about, such as removable awnings, window decorations or evening lighting schedules. There is no need to invent a universal lux target. Ask the supplier how the proposed configuration will be adjusted and verified for the actual location, including who can change the settings after installation.
Agree on the operator’s controls
Different users may need different actions. An installer may need access to commissioning settings, while shop staff may only need a documented way to restore automatic operation. Ask which controls are available in the supplied interface. Avoid writing a procedure around a control that appears in a component datasheet but is absent from the finished display.
Define what happens after a manual adjustment. Does it remain active until staff change it, or does an existing schedule restore another mode? Obtain the answer for the selected controller. A clear operating procedure prevents a temporary demonstration setting from becoming the unexplained permanent behavior of an entire installation.
Test a complete day rather than a single sensor response
Covering and uncovering a sensor may show that a control response exists. It does not demonstrate that the brightness is comfortable or readable throughout a working day. Plan observations under representative daylight, evening and transition conditions. If a condition cannot be observed during commissioning, record it as an outstanding check rather than assuming it has passed.
At each observation, record the active operating mode, surrounding conditions, normal content and viewing position. If the interface exposes a sensor reading or backlight setting, record it too. Keep unavailable values blank and describe the visual result. An honest observational record is more useful than an invented numerical acceptance result.
Use the same playlist for the comparison so changing content does not dominate the observer’s impression. A mostly white screen and a dark advertisement may look very different at the same control setting. Include both where the business actually uses them, and identify which asset was on screen when staff reported discomfort or poor readability.
Check transitions without creating unsafe conditions
Use ordinary changes in site lighting or a supplier-approved demonstration procedure. Do not open a sealed enclosure or expose electronics to water to imitate outdoor conditions. If the installation needs a controlled test that cannot be carried out safely on site, agree on an appropriate supplier test and document what that test does and does not establish.
Watch the period after a change, not just the first adjustment. Note whether the screen settles, continues stepping or returns unexpectedly to an earlier level. Describe the sequence and the active settings. That record helps the supplier distinguish a configuration problem from an obstruction, a schedule or another control acting at the same time.
Diagnose unexpected automatic-brightness behavior
The display stays bright after dark
Start with the operating mode and any manual override. Then inspect whether nearby lighting is directed at the sensing area. Check the applicable minimum setting and scheduled behavior in the operator interface. These are investigation steps, not proof of a failed sensor. Record what changes before ordering a replacement component.
Also ask whether the complaint concerns the screen itself or reflected light around it. The observer’s position and the displayed artwork belong in that discussion. If the control responds but the lowest permitted setting is unsuitable for the site, the team needs a configuration review rather than repeated cleaning or sensor replacement.
The screen seems too dim in daylight
Check that nothing blocks the sensing area and confirm the selected mode. Compare the lighting at the sensor with the light reaching the display face. If the sensor is deeply shaded while the glass receives strong daylight, document the mounting arrangement for the supplier instead of treating the sensor reading as representative of the entire screen.
Review reflections and the underlying display selection as well. Automatic control cannot make an unsuitable installation readable merely by being enabled. If the screen has reached its supported operating setting, changing the brightness curve is not a substitute for evaluating the display, the glazing and the mounting position together.
Brightness changes repeatedly while people pass
Observe whether people or moving objects cast brief shadows over the sensing area. Check whether the supplied controller offers settings for transition behavior and obtain the recommended adjustment procedure. Record the pattern before making changes. Do not assume every system exposes a filtering or hysteresis control simply because those techniques exist.
After any adjustment, repeat both the passing-shadow observation and a genuine change between brighter and dimmer conditions. A setting that suppresses short fluctuations must still allow the display to respond usefully when the environment changes. Approve the combined behavior, and record any compromise that the site operator accepts.
Include service and battery operation in the record
Maintenance instructions should identify the sensing window with a photograph or a clear drawing of the supplied enclosure. State how staff can inspect it and which cleaning method the supplier permits. If an advertising wrap or protective cover is added later, include the sensor location in the approval check before that material is installed.
For a battery-powered unit, log the brightness mode alongside the runtime result. Include the selected brightness version, playlist and relevant lighting observations. Automatic adjustment can create a different operating profile from a fixed setting. Without that record, two apparently conflicting runtime observations may simply describe different conditions.
Do not turn one favorable trial into a guaranteed operating duration for every site. Ask the supplier for the applicable battery specification and test conditions, then evaluate the required working day. If staff need a charging plan, base it on the approved configuration and observed usage rather than an assumed benefit from the sensor alone.
Questions to settle before ordering
Does an ambient sensor measure screen brightness?
It measures the light reaching the sensor, subject to its design and installation. It does not directly establish the luminance of the screen face. If the project requires measured screen output, define that as a separate measurement task with suitable equipment and an agreed method. Do not treat a lux reading as a nit reading.
Can automatic brightness replace the operating schedule?
Only if the specified system explicitly provides the required behavior. Dimming in response to darkness is different from switching the screen off at closing time. List these as separate requirements, then confirm their interaction. Staff should know which function explains the screen’s state when they arrive before opening or leave after closing.
What happens if the reading becomes unavailable?
Obtain the fallback behavior from the supplier and include it in commissioning. Do not assume the display will choose a particular brightness, stop playback or issue an alert. If the available behavior is unsuitable for the site, resolve that requirement before approving the configuration rather than discovering it during service.
Specify behavior, not just a component
A useful purchasing brief describes the location, changing light, audience position and operating schedule. It also states which controls the operator needs and how the completed unit will be assessed. “With light sensor” is too brief to capture those expectations.
Send YJCEN the installation details to discuss a suitable display configuration. Include photos of the mounting area and explain whether daylight readability, evening appearance or battery operation is the main concern. Confirm supported controls before approving the product.