How do edge-lit and direct-lit LCD backlights differ?
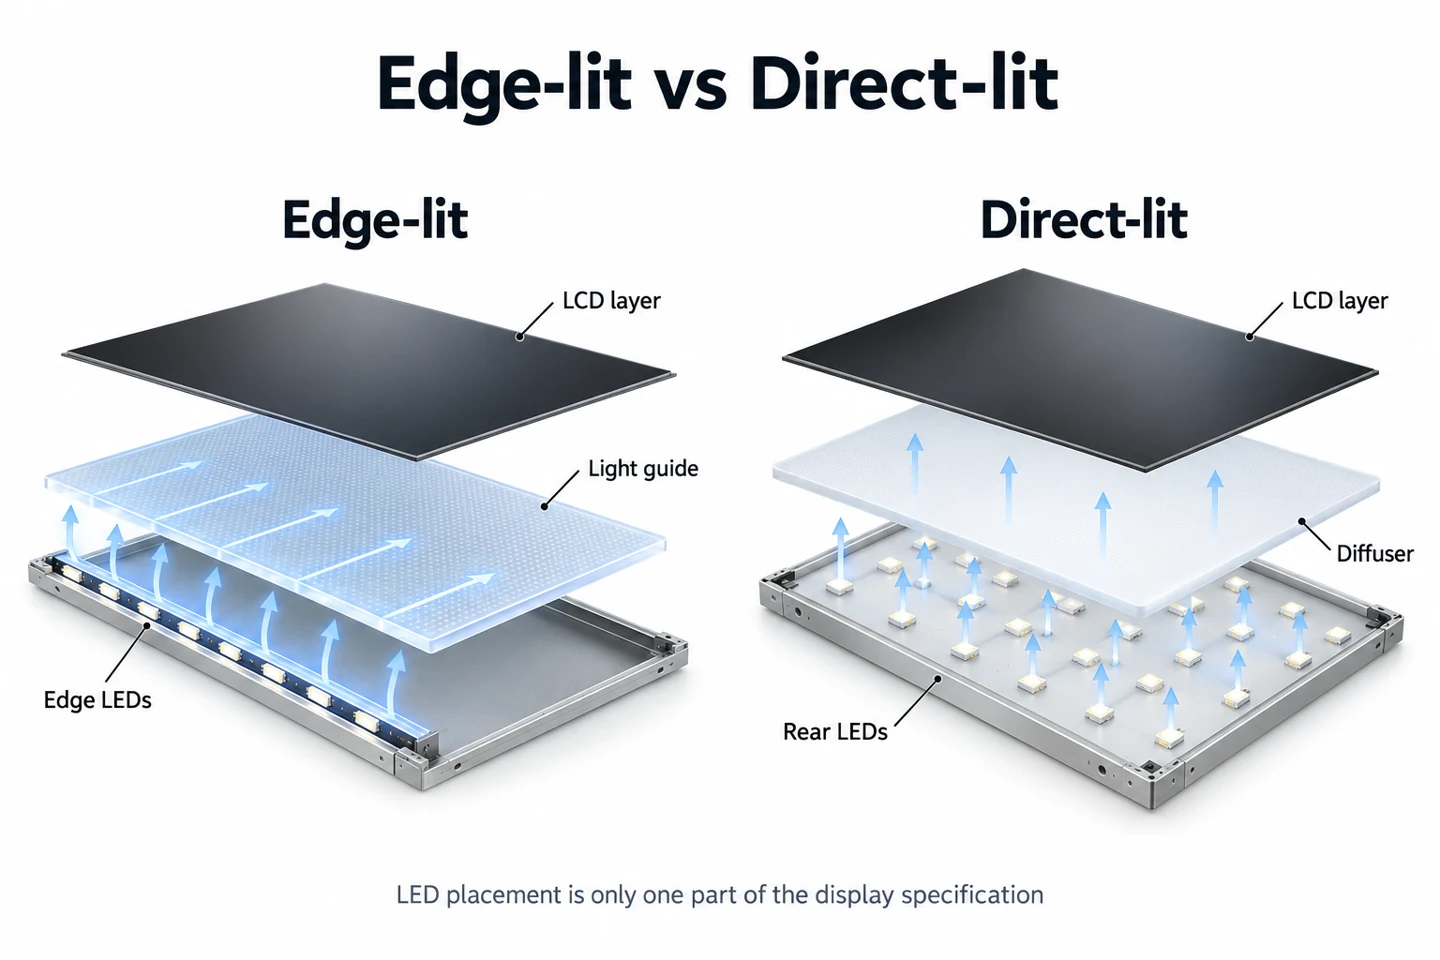
Edge-lit designs feed light from the edge of a light guide. Direct-lit designs place LEDs behind the display area. Direct-lit does not automatically mean local dimming.
- Compare real content and light, gray and dark fields under matching conditions.
- Check brightness, uniformity and contrast separately.
- Confirm the finished enclosure dimensions, mounting and service access.
- Keep power and temperature figures tied to the same operating mode; neither layout guarantees lower power use.
For commercial signage, that difference is useful, but it is only part of the buying decision. The complete screen still needs to suit your content, lighting, mounting arrangement and operating schedule. A backlight label cannot answer those questions on its own.
How the two backlight layouts work
Edge-lit LCD
LEDs sit along an edge or edges of the backlight assembly. A light guide spreads their light across the screen, with optical layers helping manage its distribution. The construction can support a thin design, but the finished cabinet dimensions must be checked separately.
Direct-lit LCD
LEDs sit behind the screen area, with space and optical layers between the emitters and LCD. This describes their position. It does not, by itself, specify the screen’s brightness, uniformity, power use or dimming behavior.
Both arrangements are LCD technologies with LED backlighting. Neither should be confused with a direct-view LED sign, where light-emitting elements form the visible image without an LCD panel in front.
Does direct-lit always mean local dimming?
No. LED placement and local dimming are separate specifications. Local dimming adjusts different backlight areas independently. A description that only says “direct-lit” does not confirm that the display has this function.
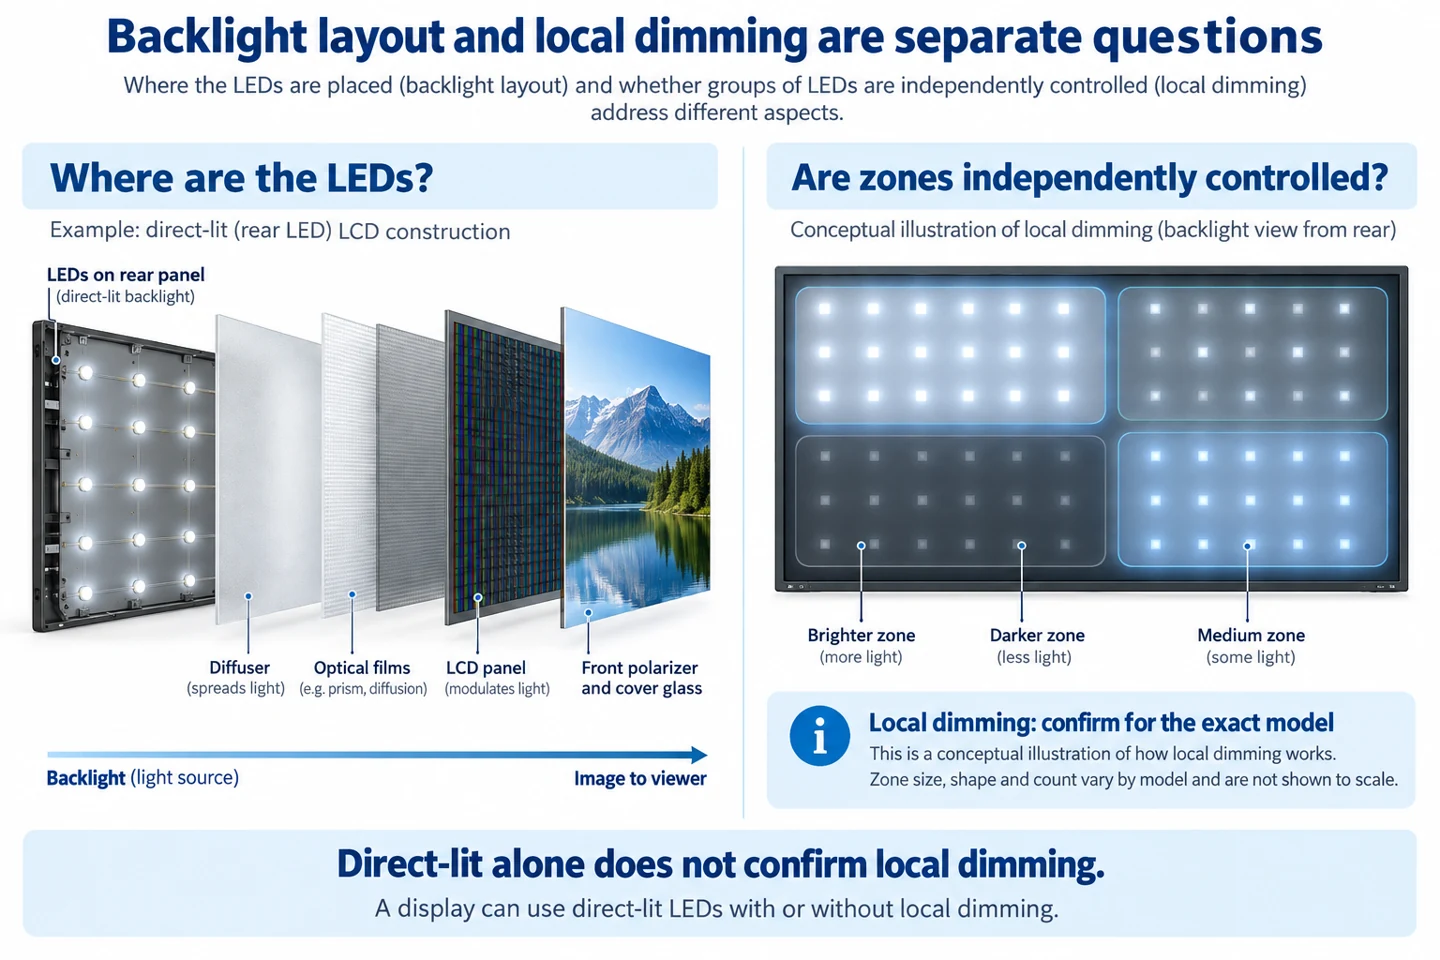
If local dimming matters to your content, ask whether it is available on the exact model and size. Ask how it behaves in the intended picture mode. Do not treat a diagram of several LED rows as proof of independently controlled zones.
A useful demonstration includes the actual content you will show. Small bright text on a dark background can reveal behavior that is less noticeable in a full-screen photograph. Record the settings so the comparison can be repeated.
Compare samples under the same conditions
Choose a short test playlist before comparing displays. Use a real menu, promotional graphic or information page from the project. Add a plain light field and a darker field to examine the screen more closely, while keeping normal content central to the decision.
Put both samples under comparable lighting and use comparable image settings. Record automatic brightness controls and other processing that may change the image. Otherwise, the comparison may reflect different settings rather than different hardware.
Look at the screen from the positions customers will actually use. A display mounted above a counter may be viewed from below and from the side. A front-on inspection at a workbench does not reproduce that arrangement.
Describe any concern precisely. Instead of writing “poor backlight,” record the content, viewing position and visible area involved. Our LCD uniformity guide explains how to document a sample assessment without treating every visible variation as the same fault.
Check the complete enclosure and installation
Ask for the finished unit’s dimensions, weight, mounting details and service access. A thin backlight illustration is not a cabinet drawing. Rear connectors, mounting hardware and required clearance can affect whether a screen fits the installation.
Confirm the supported orientation and operating schedule. Also check the stated environmental conditions and the installation instructions. These requirements belong to the complete commercial display, rather than following automatically from its backlight type.
For a screen near a window, evaluate reflections and changing daylight. A backlight arrangement does not establish outdoor suitability or sunlight readability. The chosen unit needs specifications and installation guidance that address its actual location.
Questions to include in a supplier comparison
- Which exact screen size and model does the quotation describe?
- What backlight construction is used in that configuration?
- Is local dimming available, and which picture modes use it?
- What brightness and power figures are specified, and under what conditions?
- What orientation, operating schedule and environment are supported?
- What installation clearance and service access are required?
- Can the proposed sample be checked with the project’s own content?
Keep quoted figures attached to their test conditions. A maximum brightness number and a power figure from a different operating mode should not be presented as one measured operating point. Ask the supplier to clarify the relationship before estimating running costs.
Do the same for model families. Different sizes can use different components. An acceptance record for one size should not become evidence for the whole range without confirmation from the manufacturer.
Separate brightness, uniformity and contrast
These terms describe different aspects of the image. Brightness concerns the light output of the display under specified conditions. Uniformity concerns variation across the screen. Contrast compares lighter and darker parts under a stated measurement method.
A bright sample can still show visible variation on a plain background. A display that looks convincing in a dim demonstration room may be harder to read beside a bright window. Neither observation can be explained simply by calling the screen edge-lit or direct-lit.
When a supplier quotes a figure, ask for the measurement conditions and whether it describes the panel or the complete assembled display. Cover glass, image settings and installation conditions matter to the final viewing result. Keep those distinctions visible in the comparison sheet.
For a group of adjacent menu boards, compare the units together with the same content and settings. A difference between neighboring screens can be noticeable even when each screen looks acceptable on its own. Ask how the proposed units will be configured and checked as a group.
Build a useful sample playlist
Begin with the normal content rather than a dramatic demonstration reel. A full-screen food photograph, a menu with pale areas and a dark promotional slide reveal different characteristics. Include whichever types are actually planned for the installation.
Add a small number of plain test fields as diagnostic aids. These make it easier to describe variation, but they should not become the only basis for accepting or rejecting a display. Agree on the viewing conditions and acceptance criteria with the supplier in advance.
For moving content, keep the source file and playback settings consistent. If a problem appears only during a transition, record the transition rather than only a still photograph. Ask the supplier to reproduce it with the same source.
| Content to show | What to observe | What to record |
|---|---|---|
| A normal menu or information page | Important text, background appearance and edge visibility | Viewing position, image mode and content version |
| A light or mid-gray field | Visible variation across the display | Room lighting and brightness setting |
| Small bright content on a dark background | Appearance around the bright area and any changes as it moves | Whether dimming or dynamic controls are active |
| A normal playlist transition | Unexpected brightness changes or interruptions | The source file and playback sequence |
This is a sample-planning aid, not a laboratory test standard. A phone photograph can help locate a concern, but its exposure and processing can change the apparent result. Keep the photograph together with a written observation and the test conditions.
Ask how brightness is controlled
The physical backlight layout does not tell you how the finished display changes brightness. Ask whether the intended configuration uses manual adjustment, scheduled settings, an ambient light sensor or another control. Verify the function on the quoted model.
If an automatic control is active, include it in the demonstration. A comparison can be misleading when one sample changes brightness as the room changes and the other stays fixed. Record the operating mode, not just the number shown in a settings menu.
Consider the lower-brightness setting as well as the maximum setting. A display used through the evening may spend time in conditions very different from a bright daytime demonstration. Ask the supplier to show the normal content across the settings your project needs.
Backlight control and screen construction are related engineering topics, but neither should be guessed from the other. For a separate discussion of brightness control, see our PWM dimming guide.
Keep power and temperature claims tied to conditions
Do not assume that one backlight layout always uses less power than the other. Compare the specified finished units at the required operating conditions. Their size, light output and other electronics can differ along with the LED arrangement.
For budgeting, request a power figure that matches the intended configuration and usage. Keep maximum ratings separate from expected operating values. If the supplier provides only a maximum value, label it that way rather than presenting it as a measured daily average.
The same approach applies to temperature. Ask for the supported environment and the installation instructions for the complete unit. Do not infer a temperature rating or outdoor suitability from the position of the backlight LEDs.
Tell the supplier if the unit will be recessed, installed close to another screen or placed in an enclosure. Use the required clearances and service provisions. A sample operating in open air does not demonstrate the behavior of an enclosed installation.
Three ways the buying question changes
A group of indoor menu boards
The important result is a readable, consistent group of screens. Check adjacent samples together, including the intended pale menu backgrounds and important price text. Record how the screens are configured so later replacement units can be assessed against the same requirements.
A window-facing promotional screen
The important result is visibility under the actual daylight and reflection conditions. Confirm that the complete unit is intended for the location. A decision based only on backlight construction overlooks other factors that may dominate the viewing experience.
A recessed information display
The important result includes physical fit, service access and the supported operating environment. Review the full installation drawing and instructions. A slim-looking panel assembly does not prove that the finished product can be installed flush without clearance.
Questions that a backlight label cannot answer
“Direct-lit” does not tell you the number of independently controlled zones. “Edge-lit” does not provide a brightness rating. Neither term states how long the unit may operate each day, which orientation is supported or what its warranty covers.
Put those requirements in separate lines in the request for quotation. Ask for model-specific answers and supporting documents. This makes it easier to compare offers without turning a general technology description into a promise about the finished product.
If a supplier proposes a different size or model, revisit those lines. Preserve the original requirements and record which answers changed. The goal is a display that meets the installation’s needs, with an acceptance record that can be used after delivery.
Choosing for menus, advertising and information screens
For a menu board, prioritize readable text and consistent appearance with the intended layout. For advertising, evaluate the actual photography and transitions. For an information display, include the smallest text and the longest expected viewing distance in the sample check.
These uses do not create a universal winner between edge-lit and direct-lit. They identify what needs to be demonstrated. If both samples meet the requirement, installation, service arrangements and the supported configuration can become the more useful deciding factors.
Review YJCEN’s indoor digital signage or high-brightness window displays. Share the intended location and content so the team can confirm a suitable configuration. This guide does not assign one backlight design to every YJCEN model.
Turn the comparison into an approval record
Before ordering, write down the sample’s exact identity and the settings used during the review. Keep a copy of the approved playlist. If the supplier later sends a different panel configuration, those records give both sides a clear starting point for another check.
Describe the result in terms of the project. For a menu installation, note whether important text remains readable and neighboring screens look consistent. For advertising, record whether the intended images and transitions appear acceptable under the site’s lighting. Avoid an unsupported conclusion such as “all direct-lit screens are better.”
Photograph the overall installation as well as any area of concern. The wider view shows mounting height, nearby light sources and the viewer’s position. A close-up alone may exaggerate a variation that is not visible during normal use, or conceal a reflection that matters at the actual location.
Agree how a replacement unit will be checked. It may need to match an existing group rather than look satisfactory in isolation. Keep the supplier’s configuration instructions with the installation record so a future replacement is not evaluated using unrelated picture settings.
If a sample fails the agreed check, identify the condition before requesting a different technology. A content layout, automatic setting or installation reflection may need attention. Changing the backlight category without identifying the concern can leave the original problem unresolved.
Finally, separate sample approval from model availability. Confirm the exact configuration that will be delivered and ask how substitutions are communicated. The evidence you gathered applies to the reviewed assembly and conditions; it should not silently become a guarantee for every screen carrying a similar product name.
Technical references
Texas Instruments: backlight construction and optical control reference design. Consult the selected manufacturer’s current model documentation for product-specific details.