Why is the second DisplayPort daisy-chain screen blank?
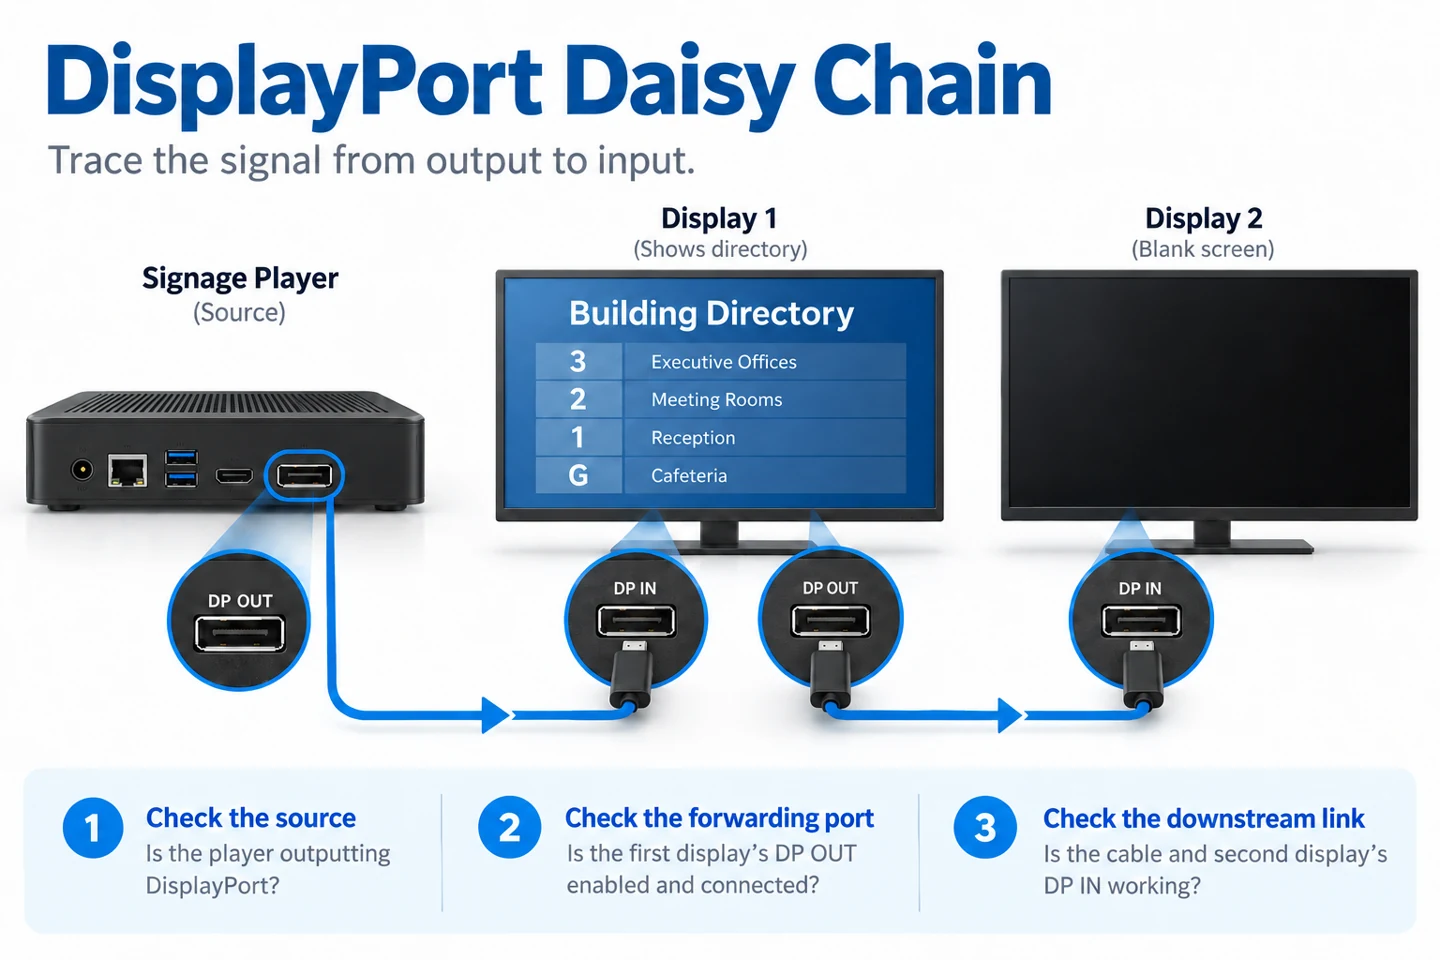
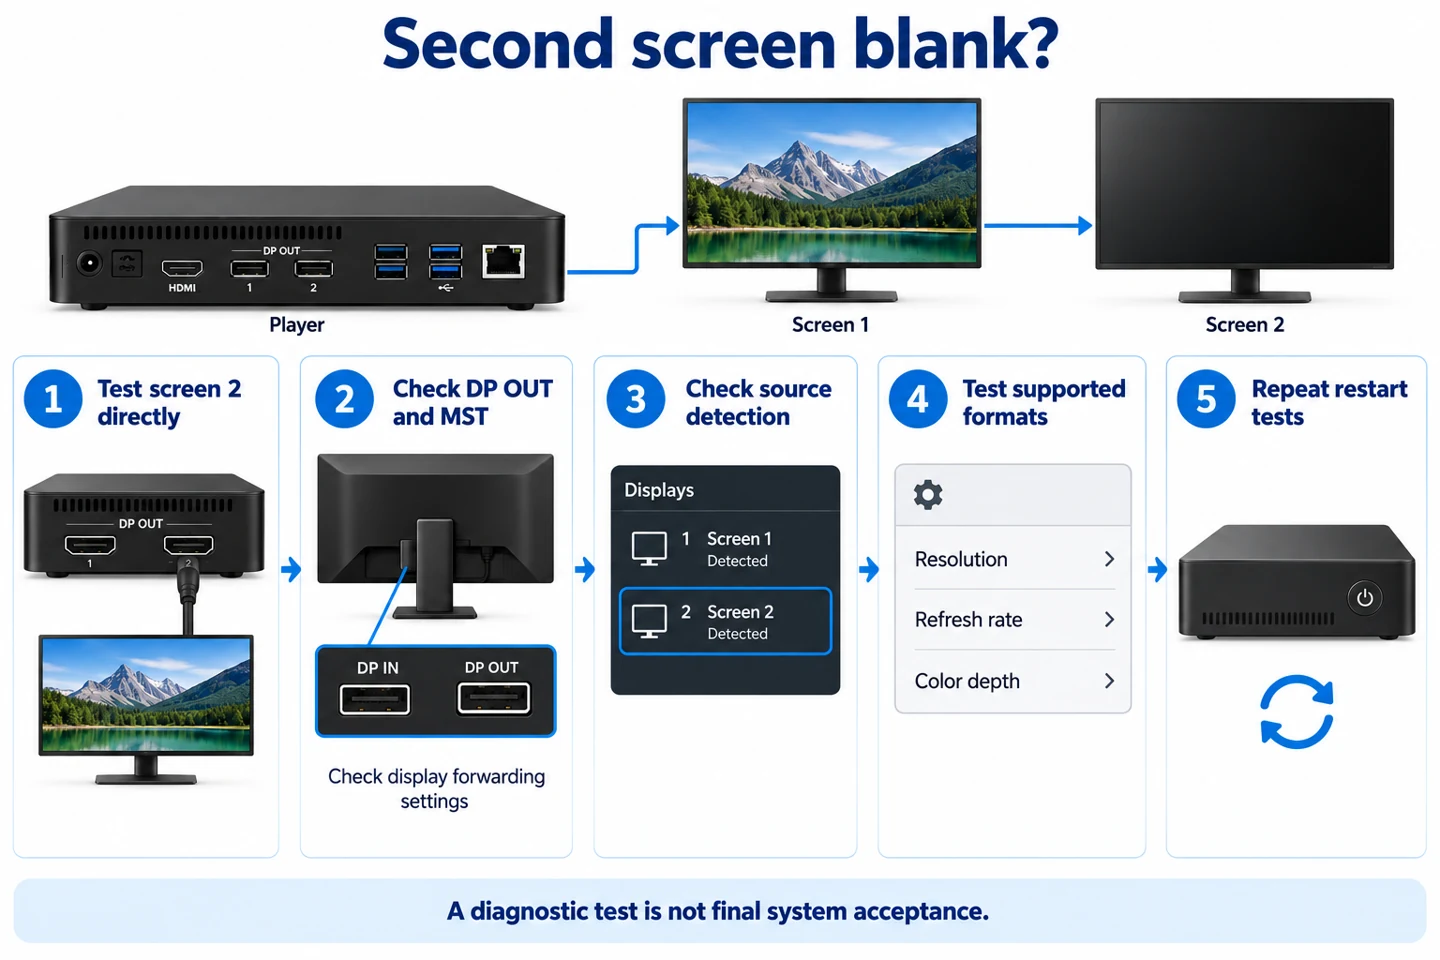
Check the source, forwarding path and affected screen separately. A working first display does not prove the complete chain supports the second one.
- Draw the source output, intermediate inputs and outputs, cables and adapters.
- Test the second screen directly with a known-working source and supported format.
- Check source detection, MST support and the model's documented forwarding setting.
- Review shared link capacity, then test restart and intermediate-screen standby behaviour after normal playback works.
This guide is for signage teams testing a proposed installation. It explains how to separate a forwarding problem from a source, format or playback problem. It does not assume that a YJCEN display includes DisplayPort output or Multi-Stream Transport (MST); confirm those functions for the exact configuration before ordering.
Draw the chain before changing settings
Write down the player model, operating system, graphics hardware and screen models. Draw each connection with an arrow pointing from output to input. A port called DisplayPort IN receives a signal; it is not evidence that the display can send a stream to the next screen.
In a display-to-display chain, intermediate displays need the appropriate forwarding capability and output. The final display can receive the last stream without forwarding it. An MST hub uses a different layout: the hub supplies separate branches to the displays. Intel’s MST reference describes these two arrangements.
Keep video and control connections separate on the drawing. A serial control loop, Ethernet socket or USB connection does not automatically carry the required video stream. Label the actual function of each cable, especially where the installation includes a separate control system.
Test the second screen on its own
Connect the affected screen directly to a known working source output using an appropriate cable. Select its intended input and use a signal format supported by both devices. This check separates a screen or input problem from the rest of the chain.
If the direct connection also fails, resolve that fault before rebuilding the multi-screen system. Check the selected input, source output and cable against the equipment documentation. Record which combination produces a picture; that becomes the reference configuration for the next test.
If the direct connection works, reconnect the first display and add only the second. Confirm any required MST or forwarding setting in the first display’s menu. Use the manufacturer’s instructions: menu names and supported operating modes differ between models.
Check what the player actually detects
Open the source system’s display settings and compare the detected screens with your drawing. Record whether the second display is absent, detected without an image, or displaying a copy of the first screen. Those are different symptoms and should not be combined into one report.
| Observed symptom | Useful next check |
|---|---|
| Second screen is not detected | Confirm source MST support, intermediate output, forwarding settings and the connecting cable. |
| Screen is detected but stays blank | Check its selected input and the actual signal format sent to that output. |
| Both screens show the same picture | Check the source desktop arrangement and whether the playback application supports separate outputs. |
| Layout changes after a restart | Record detection order, display identification and the application’s screen assignments. |
Do not assume that a player supports a multi-screen layout because its graphics hardware supports DisplayPort. The operating system, driver and playback software all matter. Ask for confirmation of the complete proposed player configuration rather than a general statement about the connector.
Reduce the signal load as a diagnostic step
MST streams share the capacity of the upstream link. The supported screen count therefore depends on the signal formats and equipment capabilities. DisplayPort’s explanation of multiple displays identifies both link capacity and source display limits as relevant constraints.
Temporarily test a lower, documented resolution or refresh rate across the chain. Change one variable and record the result. If the picture returns, investigate the requested formats and bandwidth allocation. A successful reduced-format test is a diagnostic result, not approval of the original project specification.
Return to the intended settings before acceptance. Include color format and bit depth where the content requires them. Avoid promising a fixed number of screens from a version label alone, and include any adapters or hubs in the approved equipment list.
Test recovery, not only initial playback
After normal playback works, restart the source and screens using the expected daily routine. Then test the effect of switching off an intermediate screen. Observe whether downstream screens remain available and how the application recovers. Document actual behavior instead of assuming every model forwards video while asleep.
Play a distinct label on each output during testing, such as Reception, Menu and Offers. This makes a changed screen assignment visible. Follow with the real playlist and inspect text, motion and any required audio at the intended signal settings.
Separate video detection from content playback
Use the source desktop or a simple test image to establish whether the second screen receives a usable signal. Then open the signage application. If the desktop appears but the playlist does not, concentrate on the application layout and output assignment before changing the physical chain again.
A black picture and a no-signal message are not the same observation. Record exactly what the display shows, including whether its own menu is visible. Also note whether the source lists the second screen. This gives the support team more useful information than a report that the display is broken.
For a setup with separate content on each screen, place a different large number on each source output. Verify which physical display shows each number. If the numbers appear in the wrong places, correct the layout or application assignment. Do not move cables simply to hide an assignment problem without updating the connection record.
Build a short test log instead of changing everything
Give each screen and cable a temporary label. Record the original configuration before disconnecting anything, including selected inputs and any forwarding setting. Keep photographs of the port labels with the test log. A photograph of the connector area can resolve uncertainty about which socket was actually used.
For each test, write down the one change, the expected result and the observed result. For example, a direct test might use Screen B, Cable B and the player’s confirmed output. A later test can add Screen A between them. If multiple items change together, the result does not identify which change mattered.
| Record | Example of useful detail |
|---|---|
| Connection | Source output, intermediate input and output, final input and cable labels. |
| Settings | Actual resolution, refresh rate, desktop arrangement and documented forwarding mode. |
| Observation | Screen detected or absent; image, black picture or no-signal message. |
| Recovery | What happens after the player restarts or an intermediate screen is switched off. |
Once a working reference is established, keep its settings unchanged while checking the next variable. If a change makes the result worse, return to that reference before continuing. This prevents a later test from depending on an undocumented combination of earlier adjustments.
Keep adapters and replacement parts in the test scope
If an adapter is present, identify its stated signal direction and supported function from its documentation. Include it in the connection drawing. A cable that fits the socket does not establish that the proposed signal path is supported. Ask the equipment supplier to confirm the complete arrangement when its role is unclear.
Test the equipment that will actually be delivered. A demonstration with another player, a shorter cable or a different display is useful evidence about that demonstration, but it does not approve the final installation. Record substitutions and repeat the checks they affect before signing off the changed configuration.
Give support enough information to reproduce the fault
Send the connection drawing, model details, software versions and the shortest sequence that reproduces the symptom. Include the successful direct-connection result if one exists. Explain whether the fault appears from startup, after a power change or only when the full playlist runs.
Keep the requested outcome explicit: mirrored content, independent screens or a larger canvas. Ask support which functions the proposed configuration can provide and which test should come next. This helps avoid replacing working hardware to solve a requirement that the selected configuration was never intended to support.
When another layout is easier to maintain
If the screens do not provide the required output, ask the integrator to compare an appropriate MST hub, separate player outputs or independent players. The right choice depends on the content arrangement and support needs. A repeated image, separate playlists and one large video-wall canvas are different requirements.
For those related decisions, see our splitter and switch guide and video wall controller guide. A video connection alone does not establish synchronized playback or bezel compensation.
Keep the final connection drawing, settings and restart results with the installation records. To discuss a YJCEN project, send the screen count, player details and required picture arrangement. The available interfaces must be confirmed for the selected commercial display configuration.